Remote Access VPN Configuration on Fortigate CLI
In this article we will configure remote access VPN on Fortigate firewall using command line interface. We'll also look at installation and configuration of FortiClient at client end.
Depending on the type of your client OS, you can download the FortiClient from below links.
FortiClientSetup_4.2.5.0286_x64
FortiClientSetup_4.2.7.0302_x86
After downloading the setup file, proceed to installation as per the below images (click on image to enlarge).
! Creating a user and user group to support XAuth
config user local
edit "vpnuser"
set type password
set passwd vpnuser
next
end
!
config user group
edit "RemoteVPN"
set member "vpnuser"
next
end
! Creating the IPsec VPN phase 1 for the IPsec VPN
config vpn ipsec phase1-interface
edit "RVPN"
set type dynamic
set interface "wan"
set dhgrp 2
set xauthtype chap
set proposal aes128-sha1
set authusrgrp "RemoteVPN"
set psksecret FortiKey
next
end
! Creating the IPsec VPN phase 2 for the IPsec VPN
config vpn ipsec phase2-interface
edit "RVPN_Ph2"
set keepalive enable
set phase1name "RVPN"
set proposal aes128-sha1
set dhcp-ipsec enable
set dhgrp 2
next
end
! Creating the DHCP server for the IPsec VPN.
! This will be used to lease IPs to VPN clients
config system dhcp server
edit 10
set auto-configuration disable
set default-gateway 192.168.0.1
set dns-service default
set interface "RVPN"
config ip-range
edit 1
set end-ip 172.16.40.100
set start-ip 172.16.40.1
next
end
set netmask 255.255.255.0
set server-type ipsec
set ipsec-lease-hold 0
next
end
! Creating a static route
config router static
edit 20
set comment "Remote VPN"
set device "RVPN"
set dst 172.16.40.0 255.255.255.0
next
end
! Creating a security policie for the IPsec VPN
config firewall policy
edit 30
set srcintf "RVPN"
set dstintf "lan"
set srcaddr "all"
set dstaddr "all"
set action accept
set schedule "always"
set service "ANY"
next
end
Installation of FortiClient
Depending on the type of your client OS, you can download the FortiClient from below links.
FortiClientSetup_4.2.5.0286_x64
FortiClientSetup_4.2.7.0302_x86
After downloading the setup file, proceed to installation as per the below images (click on image to enlarge).
- Select ForticClient SSL VPN
- Select Free Edition
- Select "Custom" Install
- Deselect all the features except "IPSec VPN"
- Click next and the installation will begin.
Now the installation of FortiClient is successful, so we'll proceed towards configuration of FortiClient.
FortiClient configuration
- On the remote computer, start the FortiClient console.
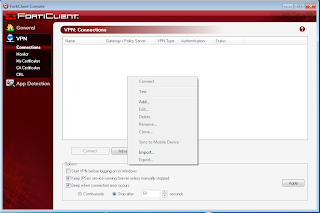
- Go to VPN >> Connections.
- Right click on the canvas area and select 'Add....'
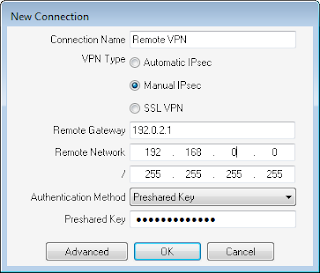
- Enter the following.
Connection Name | Remote VPN |
VPN Type | Manual IPsec |
Remote Gateway | 192.0.2.1 |
Remote Network | 192.168.0.0 / 255.255.255.0 |
Authentication Method | Preshared Key |
Pre-Shared Key | FortiKey |
- Select Advanced.
- Enter the following information.
Acquire virtual IP address | Enable and select Config to ensure DHCP is set. |
eXtended Authentication | Enable and select Config to ensure Prompt to login is set. |
Remote Network | 192.168.0.0 / 255.255.255.0 |
- In the Policy area, select Config.
- For both IKE and IPsec Proposals, remove all except AES128-SHA1 entry.
- In the Mode area, select Main Mode.
- In the DH Group area, select group 2.
- In Advanced Options, ensure that NAT Traversal is enabled.
- Select OK to close the windows.
You are done. Now you can connect to the VPN from the FortiClient console.
Alternatively, if you have VPN configuration file (.vpl), you can also use that configuration file to add the VPN connection profile just by importing it. To import the VPN configuration file, follow the below steps.
Alternatively, if you have VPN configuration file (.vpl), you can also use that configuration file to add the VPN connection profile just by importing it. To import the VPN configuration file, follow the below steps.
- On the remote computer, start the FortiClient console.
- Go to VPN >> Connections.
- Right click on the canvas area and select 'Import....'
Now you can connect to the VPN from the FortiClient console.


Comments
Post a Comment